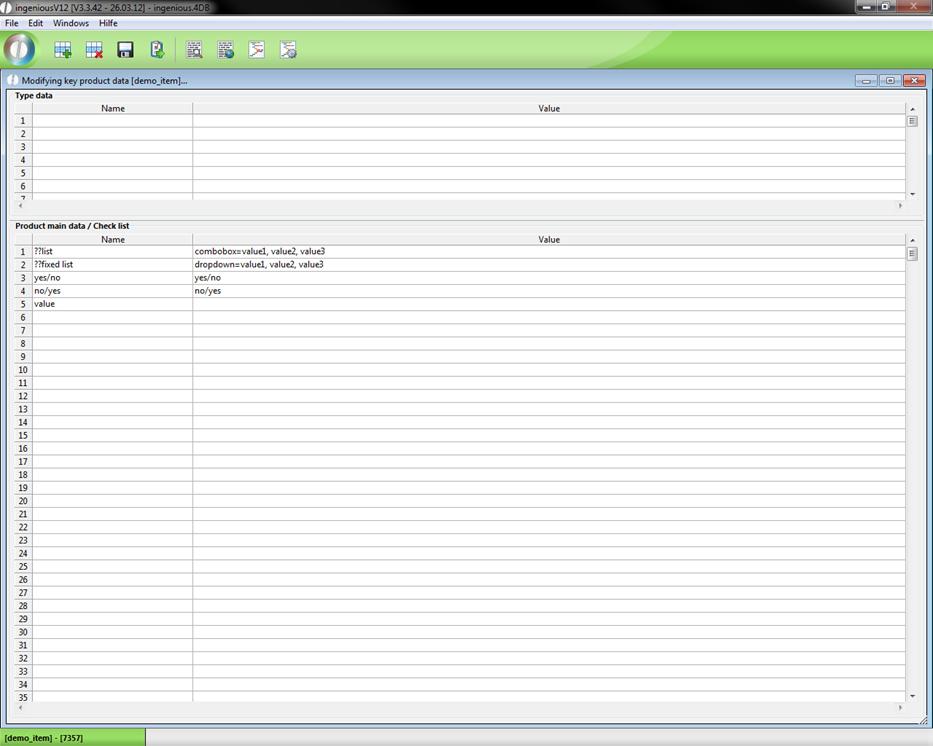
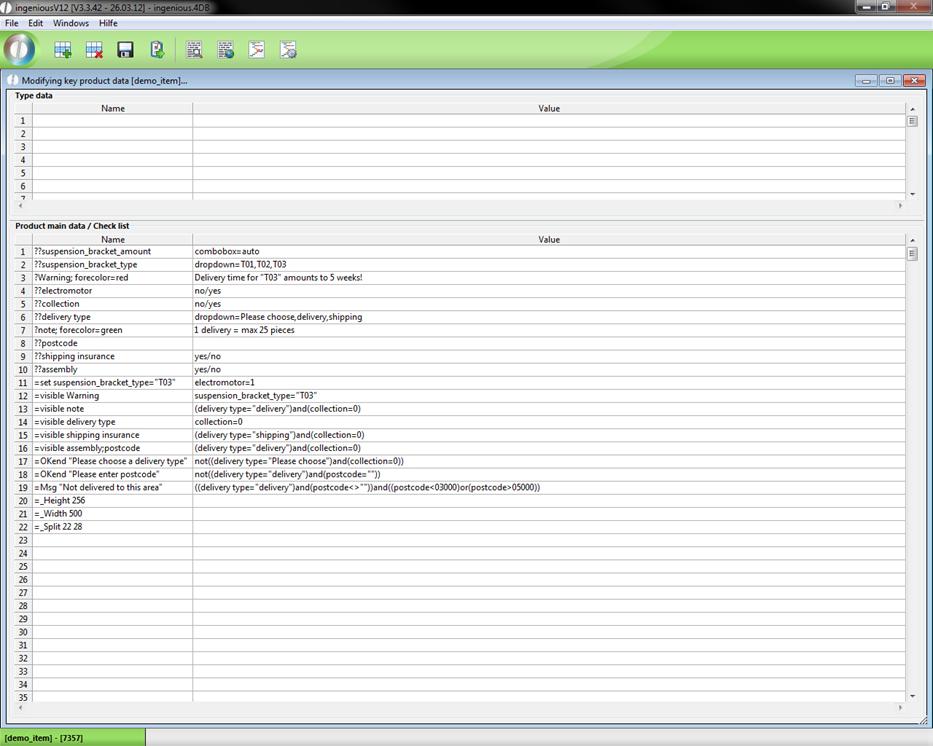
Checklists are programmable query windows that provide parts lists information on the desired variation of the product. Checklists are created with the button, ![]() for “Show and edit basic item data and checklists” in the window “Basic item data […] editing… “Checklists can be provided with checkboxes for entry fields, selection fields (lists) and Yes/No query fields. In order to do this, the field names, have to be provided “?”or entered “??” in the “Description” column. The number of the question marks decides whether the field is still changeable later as a multi position in the project positions (? changeable?? not changeable). With the field names, values will be assigned later to the parts list. In the column, “Value”, the fields must be defined and perhaps be provided with contents. If you want to have a selection field with a certain number of defined selection possibilities, write “dropdown =” and separate the selection possibilities with a comma. If you want a selection field in which the user also can enter his own selection possibility, write only “combobox” = instead of “dropdown=”. Next to the checkboxes, you write either “Yes/No” or “No/Yes”. The difference is that with “Yes/No”, a check mark is already placed in the field, and with “No/Yes” it is not. If you would like to define a normal input field, simply leave the field in the “Value” column empty.
for “Show and edit basic item data and checklists” in the window “Basic item data […] editing… “Checklists can be provided with checkboxes for entry fields, selection fields (lists) and Yes/No query fields. In order to do this, the field names, have to be provided “?”or entered “??” in the “Description” column. The number of the question marks decides whether the field is still changeable later as a multi position in the project positions (? changeable?? not changeable). With the field names, values will be assigned later to the parts list. In the column, “Value”, the fields must be defined and perhaps be provided with contents. If you want to have a selection field with a certain number of defined selection possibilities, write “dropdown =” and separate the selection possibilities with a comma. If you want a selection field in which the user also can enter his own selection possibility, write only “combobox” = instead of “dropdown=”. Next to the checkboxes, you write either “Yes/No” or “No/Yes”. The difference is that with “Yes/No”, a check mark is already placed in the field, and with “No/Yes” it is not. If you would like to define a normal input field, simply leave the field in the “Value” column empty.
View of the checklist
Commands in the checklist programming
The implementation of commands in checklists is possible. Just as a “?” stands at least before a field name, commands are initiated by a “=”.
“Visible”
With the command “=Visible”, you can show or hide fields of the checklist.
![]()
“Set”
The command “=Set” can change the value of any field. The field “Electric motor” is a checkbox. This always has the value “0” (no checkmark) or “1” (checkmark set).
![]()
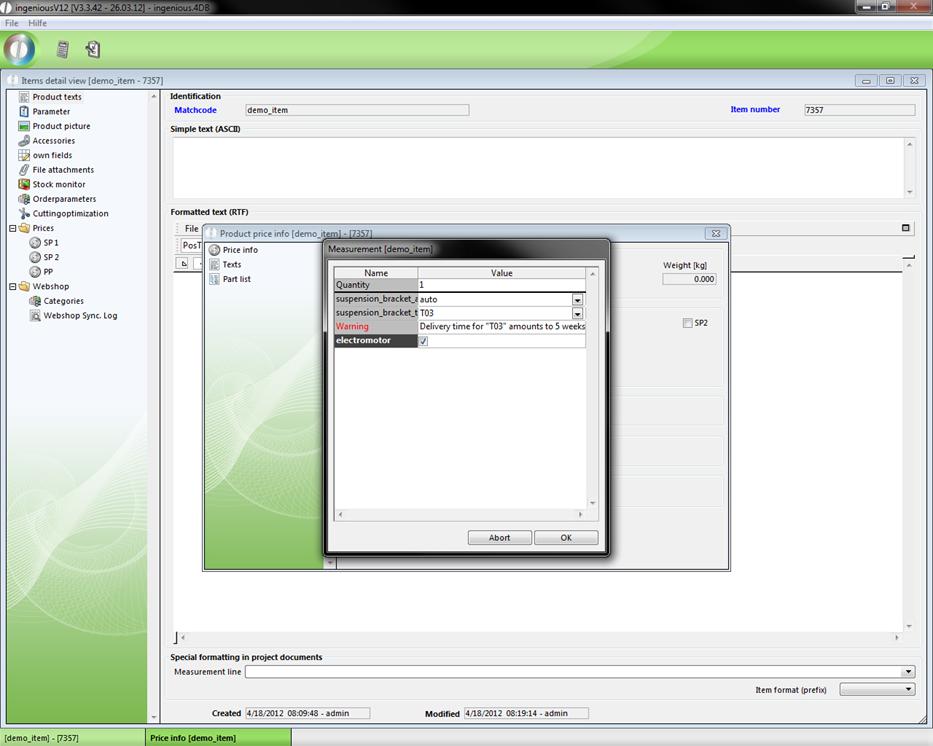
“OKend”
Error messages can be created with the “Okend” command. With this command, the conditions will first be tested when the “OK” button of the checklist is applied.
![]()
“Msg”
A second possibility to generate an error message is with the “Msg” command. This differs from “OKend” in that in every change that the user makes, the condition is checked and is immediately given an error messages when applied.
![]()
“_Height”
You can determine the height of the checklist with the “_Height” command. The designation operates in pixels.
![]()
“_Width”
With “_Width” the width of the checklist can be determined.
![]()
“_Split”
With the “Split” command, you can fix the width of the individual columns. Indeed, here 140 pixels are given as 14,220 pixels as 22, etc. Note, however, that the “_Width” command is ineffective with the following picture because under it stands the “_Split” command which defines a substantially larger area. The rule of thumb is: “The last command counts!”
![]()
“Fore color” and “Back color”
In order to assign color to fields, you can do this with the help of the key words, “Forecolor” and “Backcolor”.
![]()
See the following example of the commands:
If you now click in the checklist on the “Electric motor” field, “Deco 03” is automatically placed with “ Ceiling Mount_Type”. This can only be changed only if one again removes the check. In addition, the row “Attention” appears as soon as “Deco 03” is selected “.
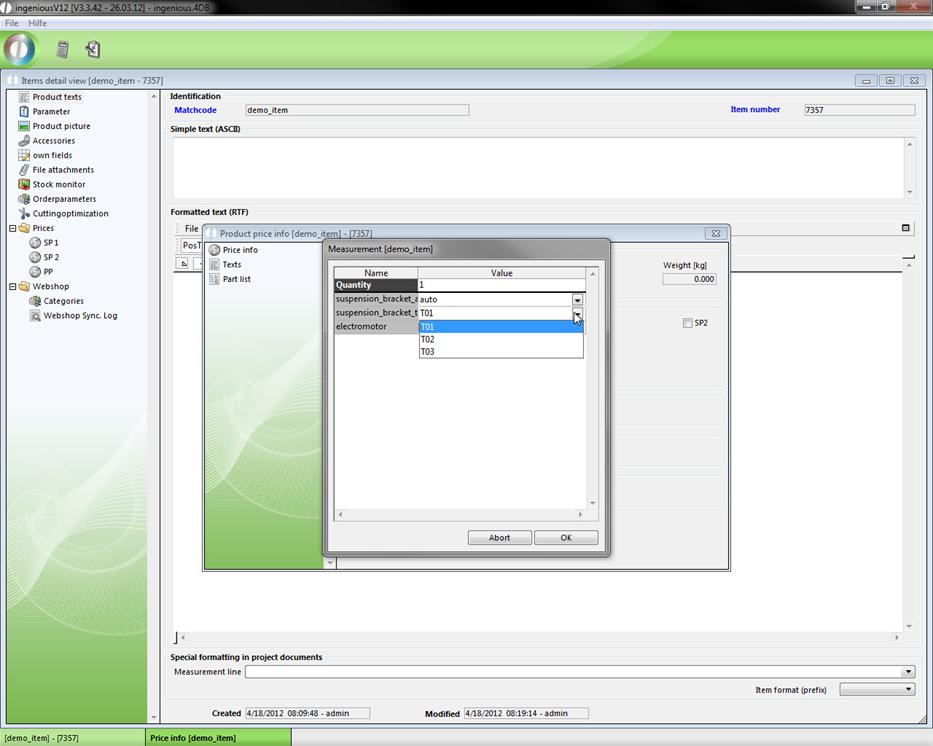
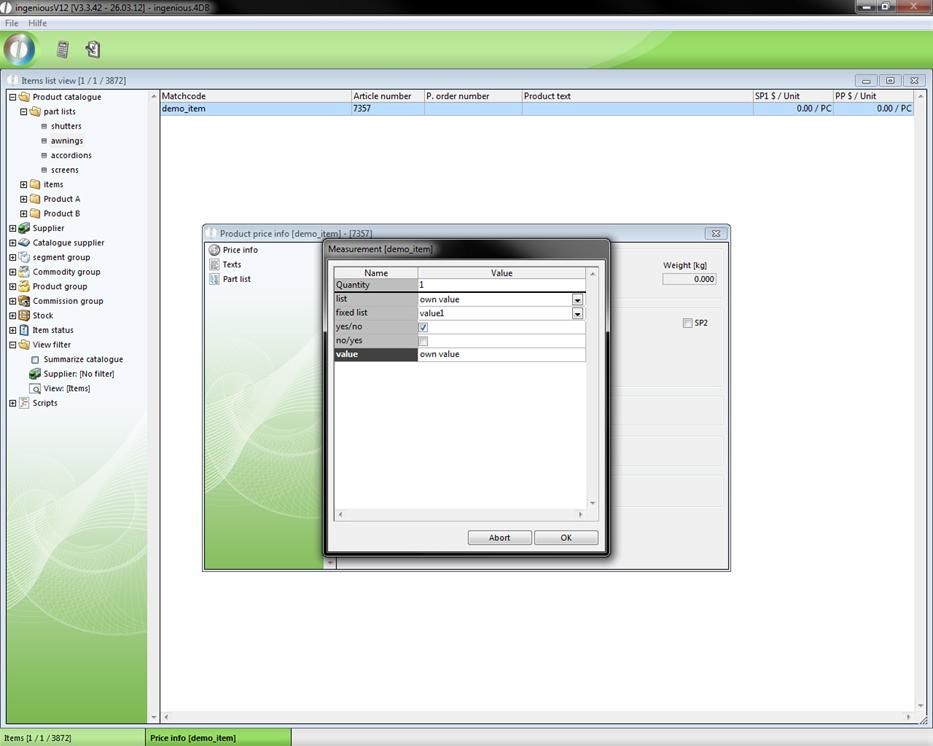
Two views of the measurement window
To make the start with the parts list programming a little easier, a short exercise follows. Here you should provide a parts list for a vertical blind. In the list, the kind and the number of ceiling mounts as well as the delivery for the suitable Venetian blinds should be taken into consideration.
Practice creating parts lists
In order to create a parts list, you first need a blank item file in which this example will be calculated as a square meter price (sqm price).
1. Add a new item with the matchcode, “D-Vertical Blinds”.
2. Click on the ![]() button in order to create a checklist and prepare it according to the following illustration.
button in order to create a checklist and prepare it according to the following illustration.
View of the finished checklist
3. Save the checklist and click in the detailed view of the item provided on the button ![]() “Edit service positions and test parts lists” in order to be able to now begin with the programming of the parts list.
“Edit service positions and test parts lists” in order to be able to now begin with the programming of the parts list.
The following window appears:
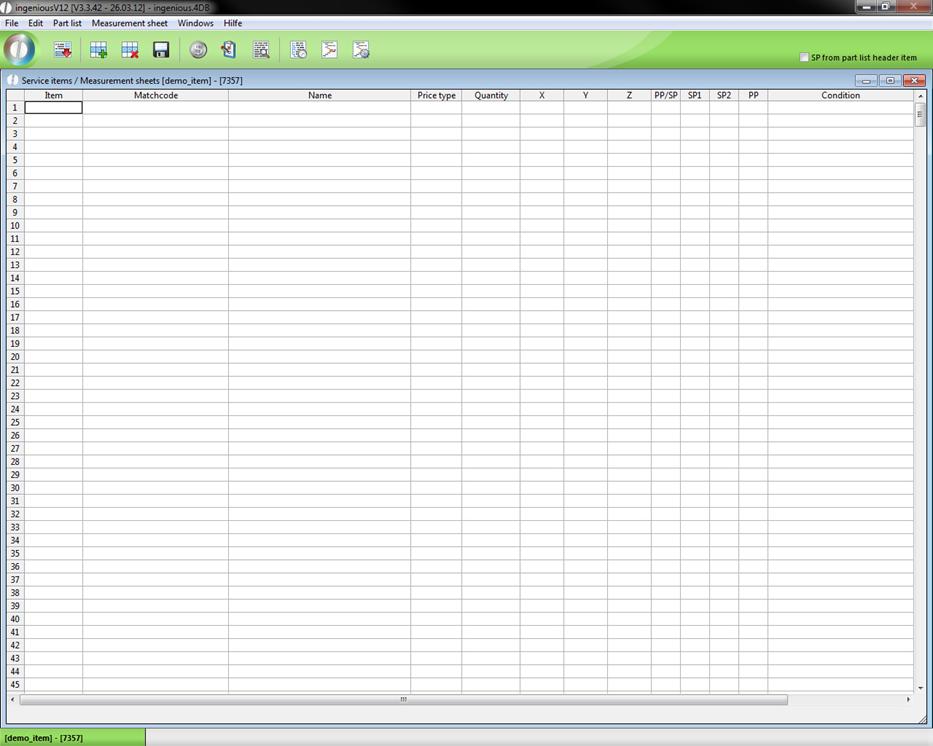
Note: The items used in the following parts list (“Vertical blind”, “Deco 01”, “Deco 02”, “Deco 03”, “Electric motor”) are provided by Ingenious especially for this exercise. If they are not available in your database, you must provide this first (with prices) or replace this in the parts list with other items. This manual describes the production of the parts list line by line, with a picture in each case. Pay attention, however, to the column heads, because due to lack of space, some columns were hidden without contents.
4. Create the variable base price, “BP” and enter “Vertical Blinds” as a matchcode. If this item is in your database, Ingenioius.net completes the remaining cells of this column automatically. In order to later receive a corresponding content text on the parts list, the text, “{jum.m} Vertical Blind (s)” with the column, “Description” must be written. Thereby the placeholder, “{jum.m}” is later replaced with the ordered number of Venetian blinds.
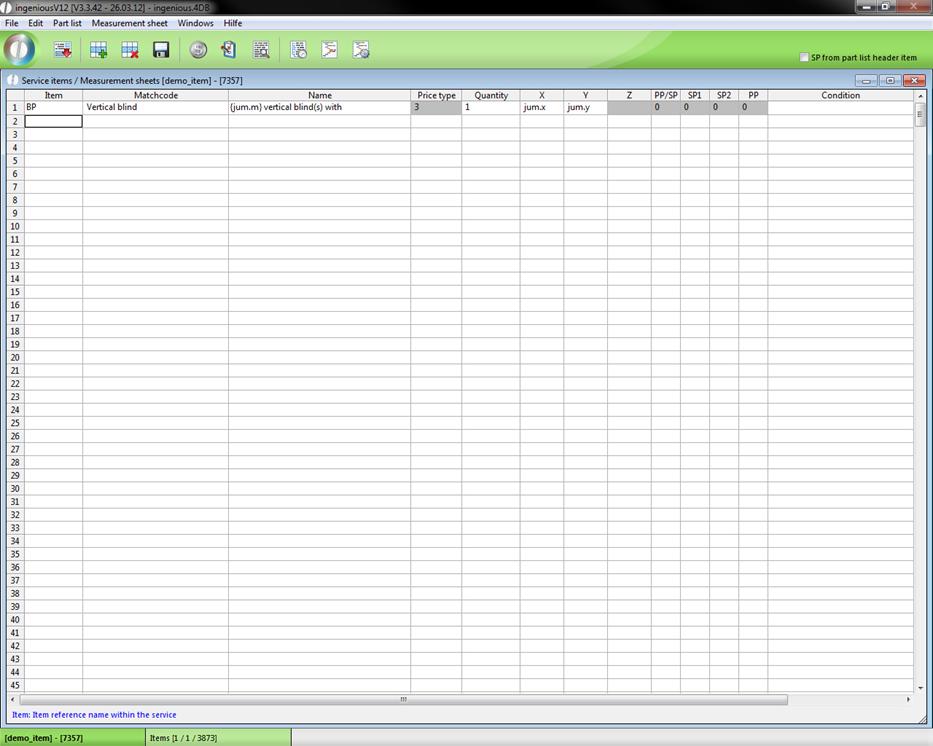
The field price type was automatically filled with the figure “3”. The reason for that is that the item “Vertical Blind” has a square meter price. In order to guarantee the clarity in the parts list programming (place to save) the price types and price ratios are shown in transformed numbers. Besides, the following relations apply to the price types: 0 = piece, 1 = piece scaled, 2 = x, 3 = x/y, 4 = x/y/z, 5 = x scaled, 6 = x/y scaled price.
5. Next the parts list should calculate the number of the required ceiling mounts. Besides, you should take into consideration what the user has entered in the field “CM_Pce” of the checklist. Because this field is a “list”, the user can choose between the value “Auto” (automatic calculation) and an individual value. Now define the variable “CM_Pce” and write the following formula in the field “Name”: tab (jum.x) (100; 150:2; 3; (jum.x\50))
A tab command is a “If-Then” command (in the computer language “C” or “C++” is comparable with a “Case” command). In this example it means if “x” (the width of the Venetian blind “) is <=100, then the “CM_Pce ”should be 2. If “x” is <=150, then “CM_Pce” should be 3. In case “x” is neither <=100 nor <=150, then the division \should be divided into whole numbers (“\”) by 50 (= “Default” value in “Case” command).
6. Attach the formula to the following condition: jum. CM _Piece = “auto”. With that, you determine that only this row is implemented if the value “Auto” was selected in the field, “CM_Piece”.
7. The next line should intercept in the case that the user gives his own number of cover fixtures. Define the variable “CM_Pce” again and enter the opposite condition of the preceding line: jum. CM_Pce <> “auto”. With the command “jum. CM_Pce” in the cell “Name”, you decide that the variable “CM_Pce” is filled with the value which the user has entered in the checklists field “CM_Pce”.
8. Now you have determined the number. Now you must still notify the parts list of the corresponding types. In addition, in the next three lines you enter (in the column “matchcode”) one of three prepared items by Ingenious.V12: “Deco 01”, “Deco 02” or “Deco 03”. The lines are indeed completed again and you must enter the variable “CM_Pce” calculated by us in the “Quantity” column. Even here you enter the suitable text “{CM_Pce} cover holder of the type “Deco 01” as a description in the “Description” column. As a condition you also carry the formula corresponding to the item “jum. ceiling mount_Typ = “Deco 01”, „ … Deco 02 “ or” … Deco 03”.
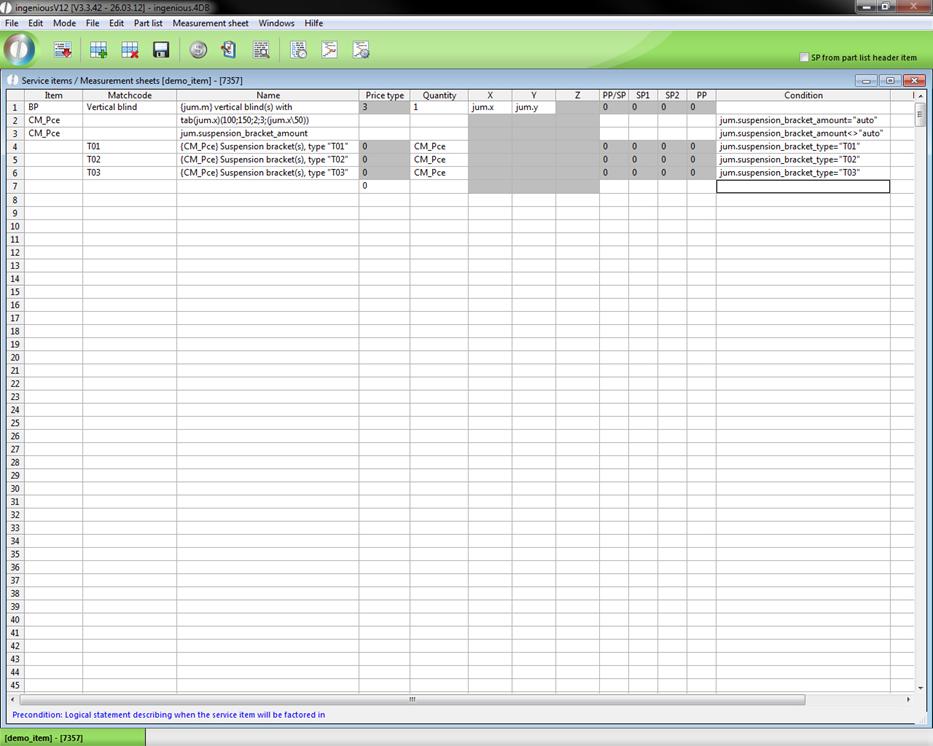
9. Since there is the possibility to order an electric motor in the checklists, enter “Electric motors” in the matchcode cell. After the line is completed again, you only must enter one more condition “jum. electric motor=1”. This should also be described again briefly (“and electric motor”) in the “Description” column.
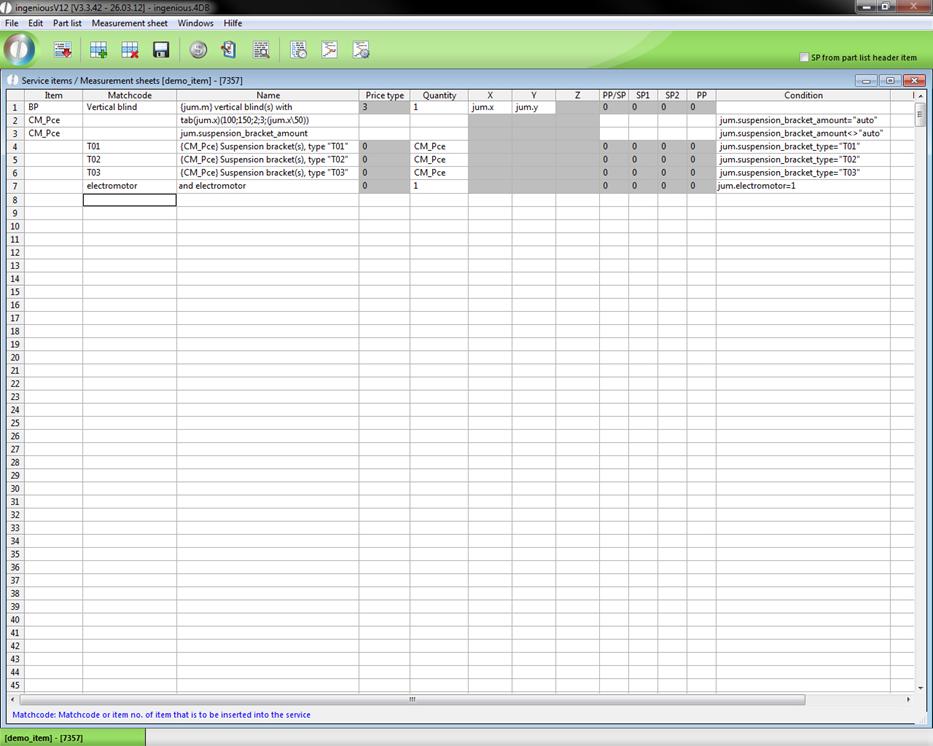
With the checkboxes, as it is with the field, “Electric motor”, the value “1” stands for yes (checkmark). And the value "0" stands for no (no checkmark).
In order to find a position later in the parts list, you have by now entered the existing items from the database into the matchcode cell. Now with the following positions “Shipping insurance”, “Delivery” and “Assembly”, you should become familiar with another possibility.
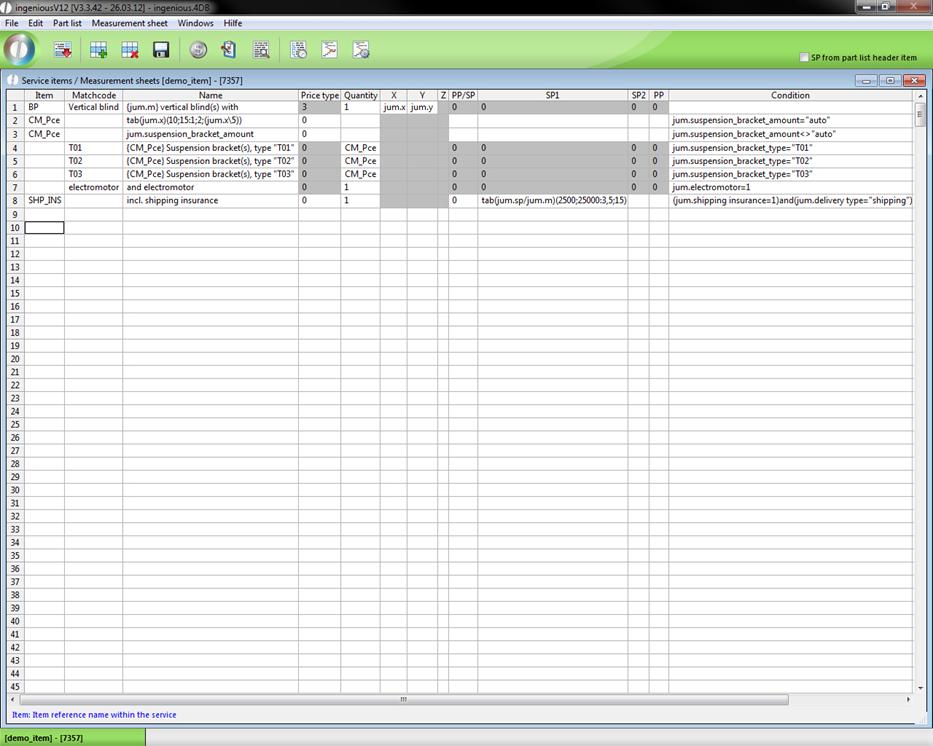
10. In our checklist, shipping insurance is optionally offered (by check box). In order to have this shown later in the parts list, although no item for it exists, you must enter a number between 0 and 4 in the “PP/SP” column. With which PP/SP the item should be calculated is according to this number. Thereby, the following relation applies: 0 = EUR/EUR, 1 = EUR%, 2 = %/EUR, 3 = min-item 4 = LE-item. With the entry of a price ratio, you instruct Ingenious.V12, to show this row later in the parts list.
11. Furthermore, attach the variable, “SHP_INS” that is to be later included in the parts list and enter the name (“incl. shipping insurance”) in the “Description” column. In order calculate a price for this position, insert the formula “tab (jum.SP/jum.m) (2500; 25000:3,5; 15) “ in the column “SP 1”. With that, you assign the value “3.5” to the variable, “VER_VER” if the selling price per blind is <=2,500. (Attention: “SP” is calculated up to the current position in the parts list). If the “SP” is < =25,000 it is calculated as15 $ per piece to the contact for the shipping insurance. Since it is very unlikely that a vertical blind will cost more than 25,000 $, an error correction (“SP” > 25000) is not really necessary. Whoever wants to include this can nevertheless play it safe and estimate 0.3% of the insured sum as insurance costs with the formula (change italics) “ tab (jum.sp/jum.m) (2500; 25000:3,5; 15; ((jum.SP/jum.m) *0,003))” on the number. In the cell, “Condition”, you must now establish that this row is only executed if the user has decided on shipping the Venetian blind with shipping insurance. Enter the following linked condition in the cell: (jum. Shipping insurance=1) and (jum. Delivery type = “Shipping”)
12. Click in the ninth line and define the variable “DEL_Q”. This stands for “Quantity delivered”. In this row, the parts list should calculate the delivery; if a delivery contains a maximum of 25 Vertical blinds (incl. ceiling mounts and motors). For that, you must enter the following comprehensive formula: tab (jum.m\25=jum.m / 25) (-1;0:(jum.m\25)/jum.m;(jum.m\25+1)/jum.m). With this formula, you first calculate if the number of blinds complies in whole numbers, dividing the sum of the number of blinds by 25. If yes, (“1”), then (jum.m\25)/jum.m is calculated. If no, (“0”), then a 1 is added to the 25.
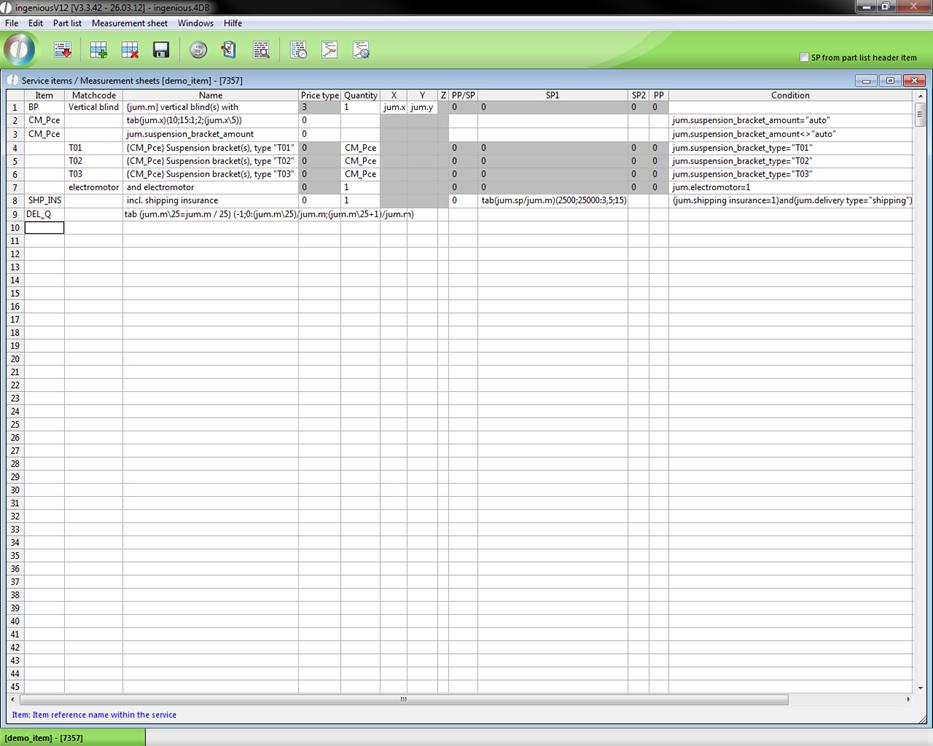
13. Now the delivery can be registered into the parts list. In the row, “Item”, enter the variable name “DEL_P” in row 10 enter “Incl. Delivery” in the “Description” row. Now the previously calculated number (“DEL_Q”) can be registered into the “Quantity” column. For the price calculation that corresponds to the buyer’s zip code, the price is calculated with the formula tab (jum.PLZ) (3000; 4000; 5000: 70; 60; 55) in the cell “SP 1”. As a condition for this row, it has to be determined that it is only to be considered with “Delivery”. In addition, you enter jum. Delivery method= “delivery” into the cell. Don’t forget to fill the rows “Price method” and “PP/SP” with a “0” in each case.
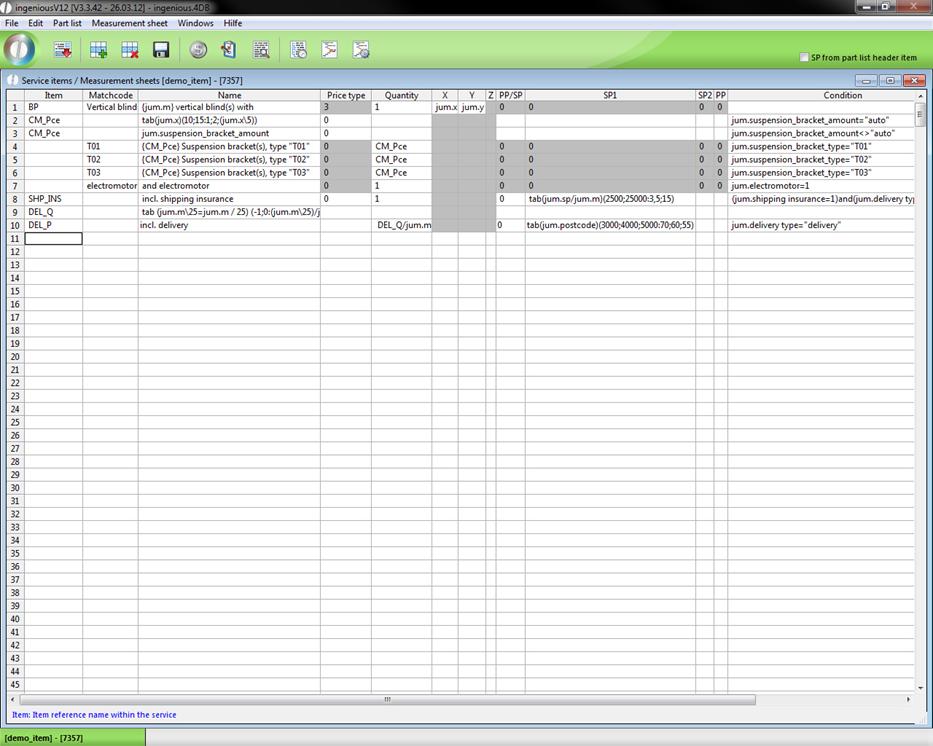
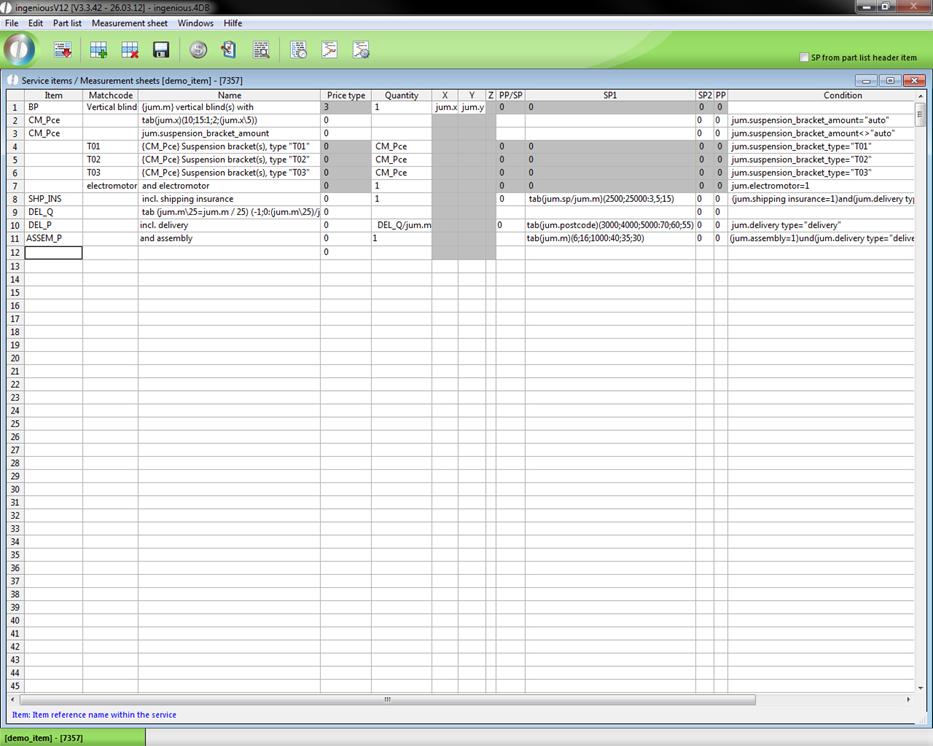
14. Finally, the calculation of the assembly is still inserted into the parts list. Create the variable “MON_P” in row 11 and enter “Description” & “Assembly”. Furthermore, enter “Quantity” in the “Quantity” row, switch to the cell, “SP 1 “and enter the following formula for the price calculation here: tab (jum.m) (6; 16; 1000:40; 35; 30).
For the completion, the condition (jum.Assembly=1) and (jum.delivery type= “delivery”) must be entered.
15. Fill in the blank cells of the columns, “Price type”, “SP 2” and “PP” with a “0”respectively.
Your parts list looks as follows:
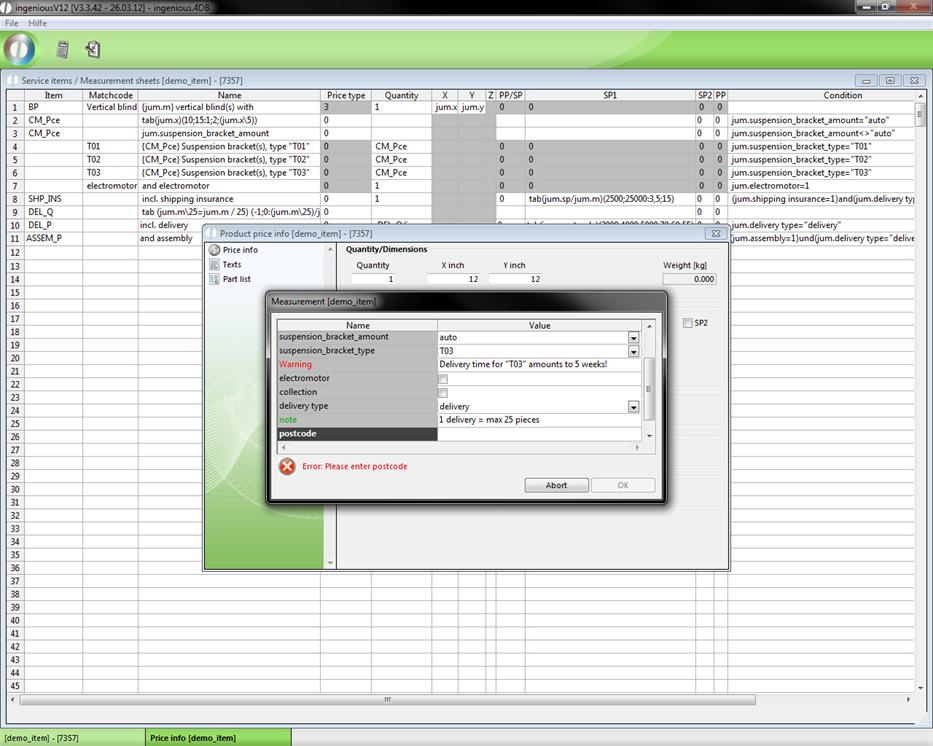
Once you have precisely had a feeling for the parts list of the figure, it is then finished and completely functional. Try this out immediately by clicking on the ![]() button in order to reach the “Product Price info” window. Here you can open your checklist with the help of the
button in order to reach the “Product Price info” window. Here you can open your checklist with the help of the ![]() button. Test multiple different settings and pay attention to the (price) changes.
button. Test multiple different settings and pay attention to the (price) changes.
Dynamic input items
When you create a check list you can also use objects that can be controlled by scripts {Exec_Script(Script name)} or by jumbo command {tab(…)}. For a better understanding two practices will follow.
Practice about the jumbo command {tab(…)}
1. Create a test item and open the check list configuration. Add the field “??test” with a checkbox “yes/no” and the field “?dynamic object” with “combobox={tab(jum.Test)(0;1:"1;2;3";"4;5;6")}”.
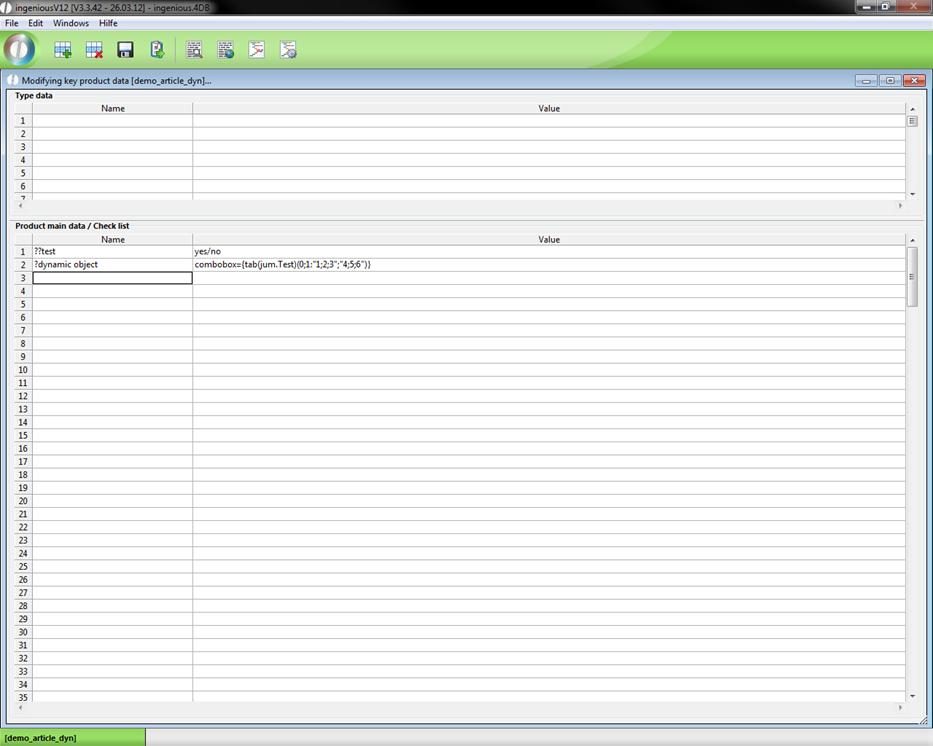
The “tab” command checks, whether the checkbox Test is checked or not. If it is checked, the list “dynamic object” contains the values 4, 5 and 6; otherwise 1, 2 and 3.
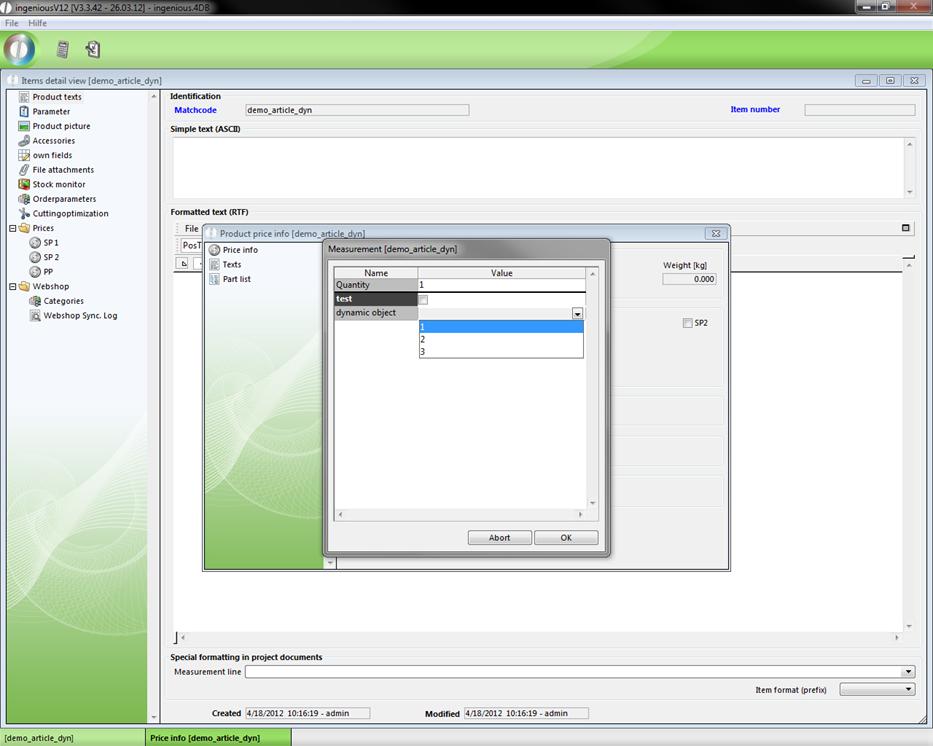
2. Save the changes and click ![]() and
and ![]() to view the created check list.
to view the created check list.

3. Now uncheck “test” and look at the changes.
Practice about {Exec_Script("Scriptname")}
1. Open the test item again, change the combobox to “combobox={Exec_Script(“dynamic”)}” and save the changes.

2. Now open the free data manipulation and create the new script “dynamic” with the following content.
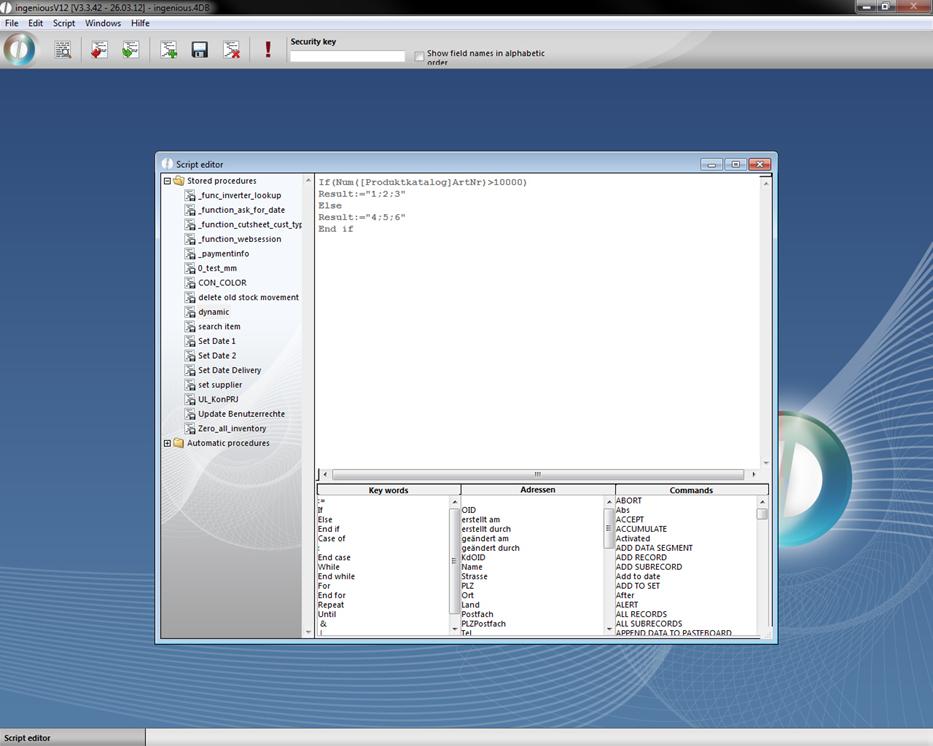
The script checks the item number. If it is bigger than 10000 the numbers 1, 2 and 3; otherwise 4, 5 and 6 will be given out.
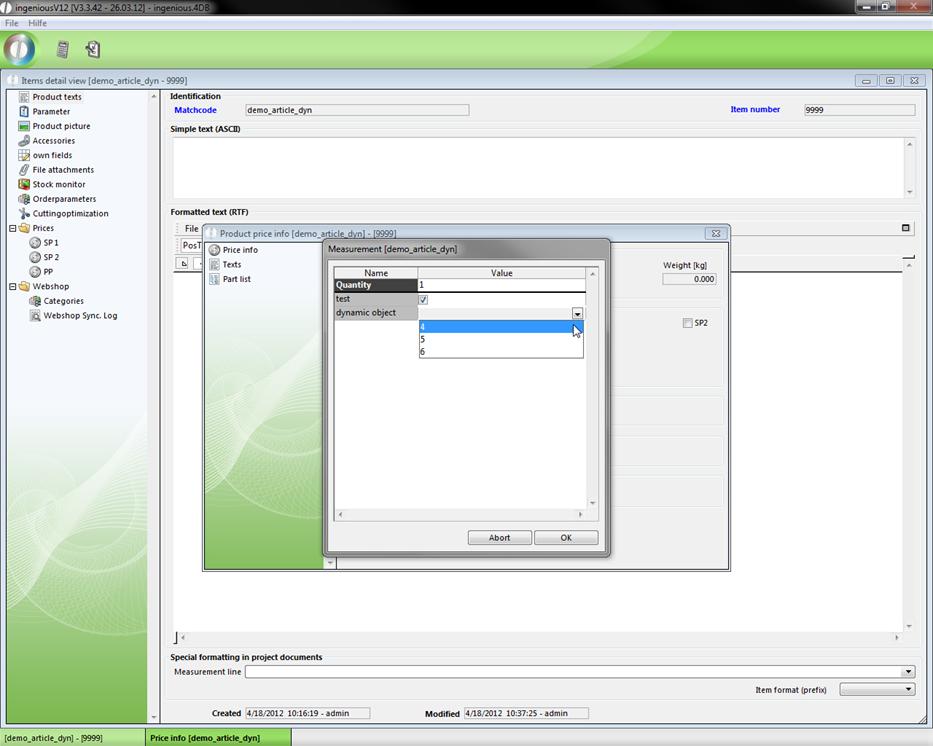
3. Go back to the test item and change the item number to “11111”. Now open the check list.

4. Now change the item number to “9999” and check the check list again.
Visible- and Set-commands for the multi item input
The Visible- and Set-commands and dynamic field are supported in the multi items. That means, you can also customize every item in the multi item input individually.
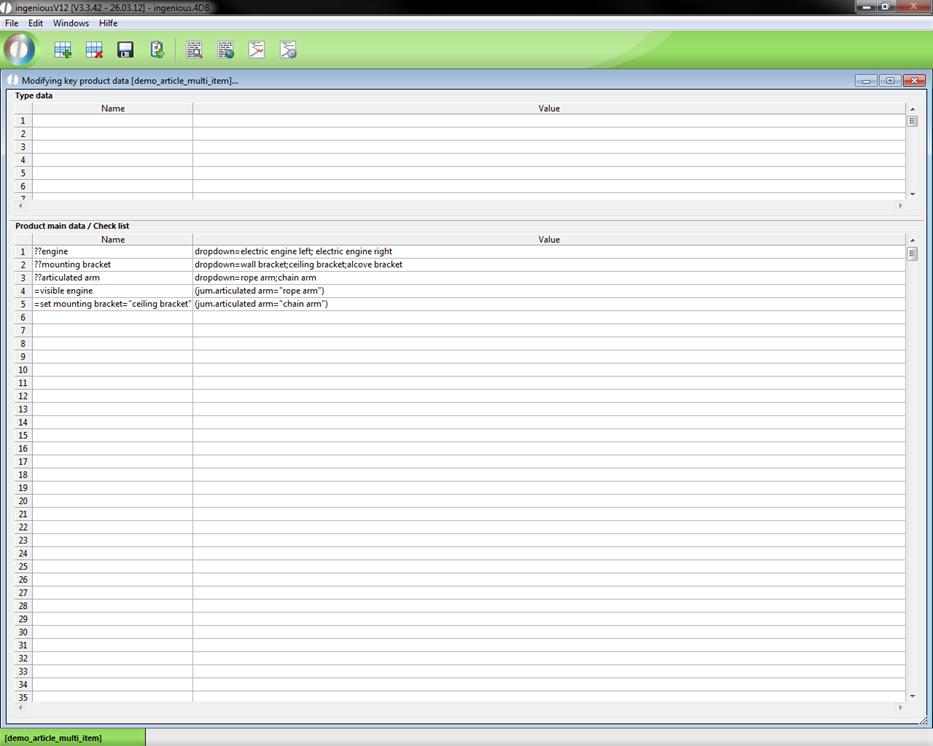
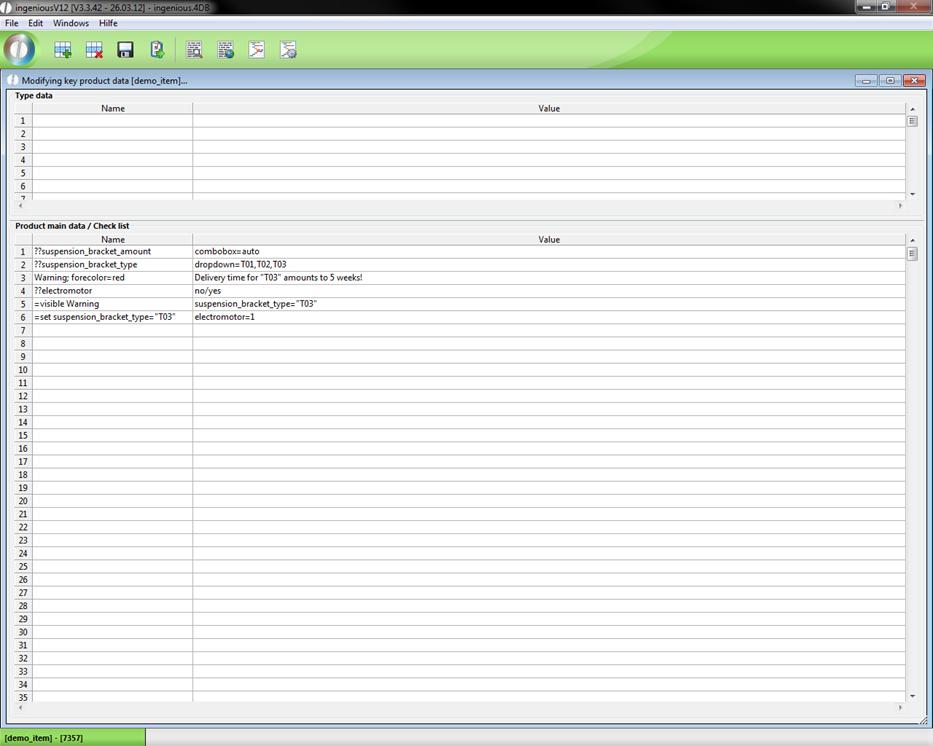
Example of a check list
When rope arm is selected the field “engine” is displayed. Otherwise it is invisible. If chain arm is selected, the value for the field mounting bracket is automatically set to ceiling bracket.
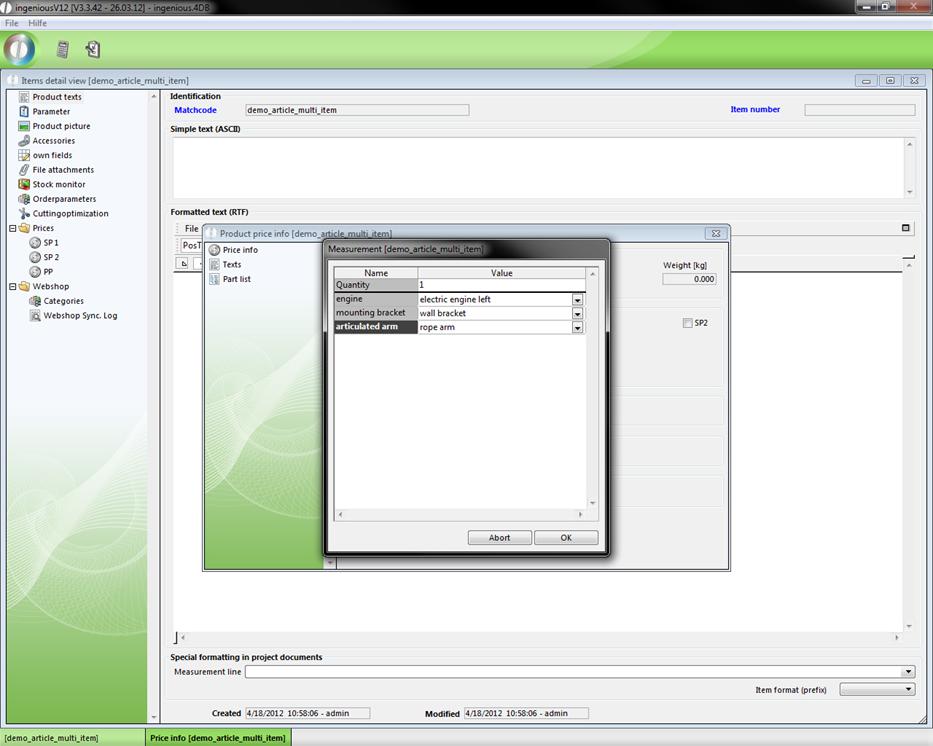
Check list, when rope arm is selected
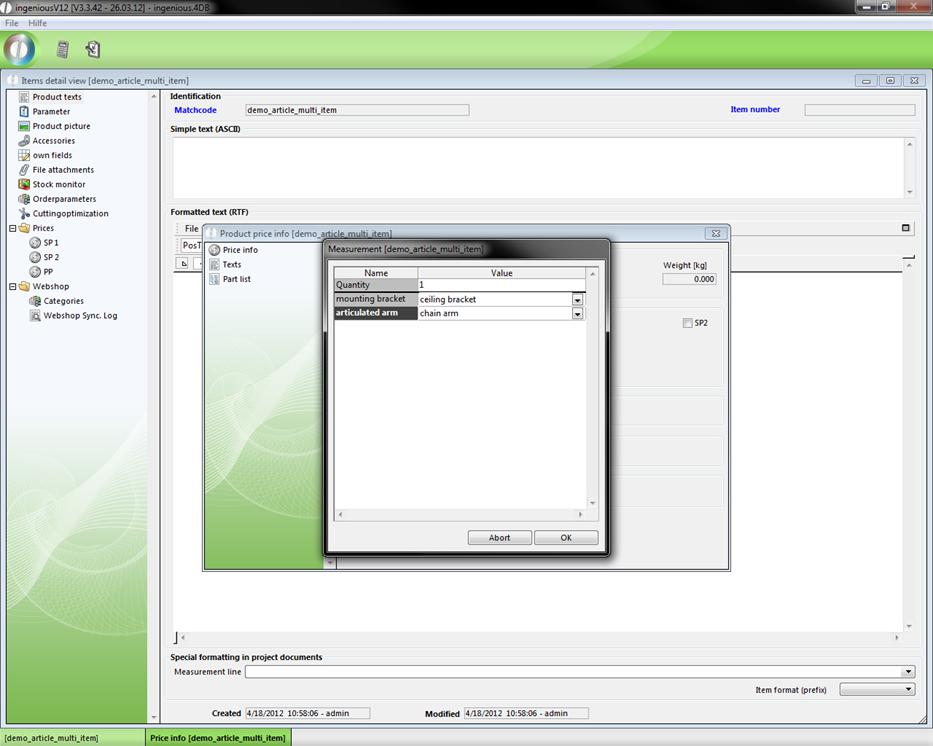
Check list, when chain arm is selected
When you add a multi item in a project the commands will be taken over and executed. Invisible fields are colored in grey.
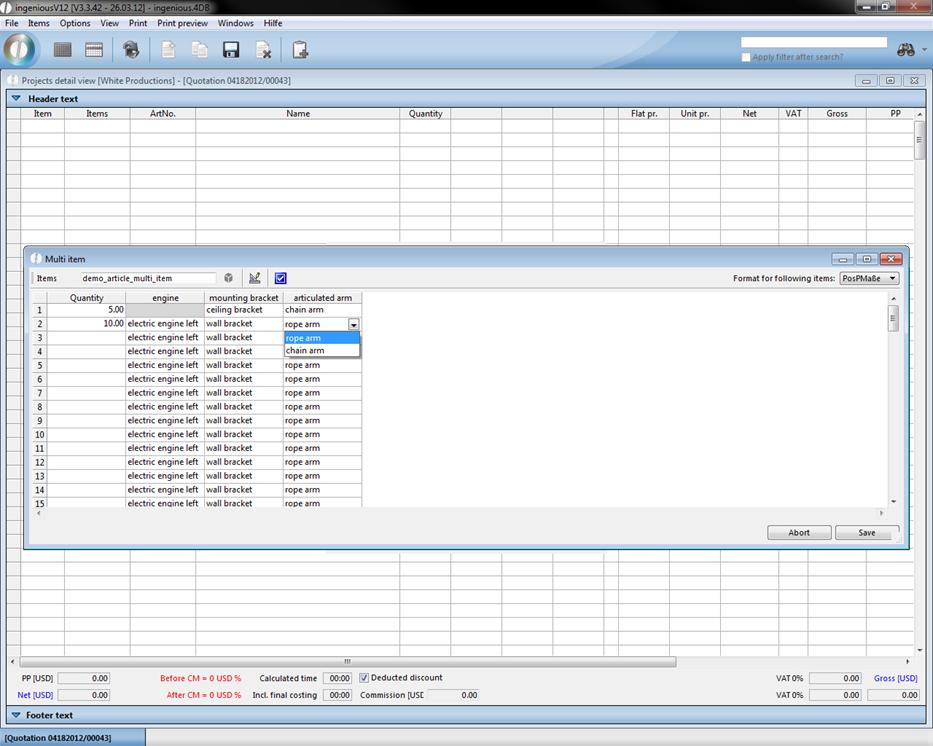
View of the multi item
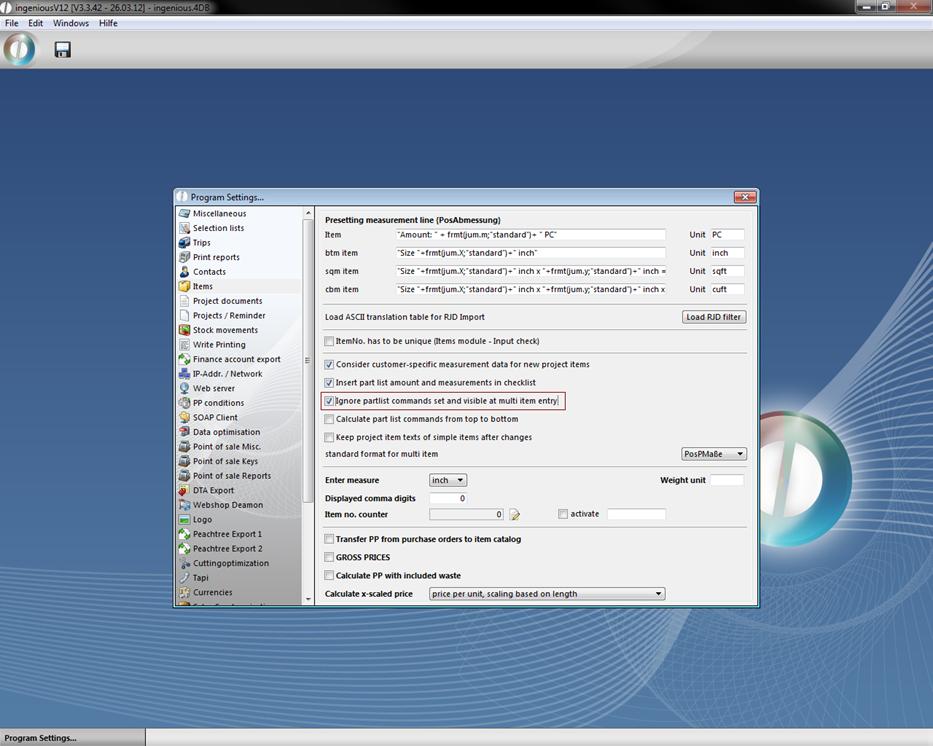
Note: In the program settings in the category „Items“ you have the opportunity to deactivate the individual customizations for the multi items by checking “Ignore partlist commands set and visible at multi item entry”.